Purpose
To add labels, add notes, and leader lines on a layout or truss. add notes to truss drawing notes You can also save notes and re-open them later for editing. The Repeat button also lets you repeat a label anywhere on the layout.
Prerequisites
An existing layout or truss
Steps
- From the CAD Markup menu, select Text, click
 , or right-click to select.
 - At the location near the layout where you want to add a note/label, click and drag to draw a box.
A text box displays on the layout, along with the Label / Dimensions dialog. A sample is shown below.
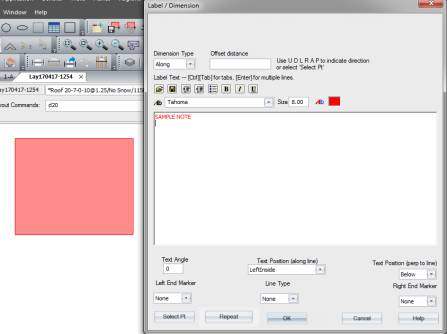
- Enter text in the window.
You can also format notes on this window:
- Select a font and text size for the note
- Select the text color for the note by clicking the colored square; a color picker window displays.
- Format text using bullets, bold, italics, underscore
- Select a text angle and position
- Repeat labels anywhere on the layout. After you edit a note, click Repeat to repeatedly place the note anywhere on the layout.
- The Label/Dimension dialog can be resized to accommodate larger fonts. When the dialog is enlarged, the text size increases. The dialog size is retained between sessions in Truss Studio.
- To save the notes you entered, click
 .
. - Name the file. You can open it later for editing, if needed.
- Click OK when you finish with writing and formatting notes.
The note/label displays on the layout or truss.
To access a saved note for editing:
1. Click the note.
2. Select the Label Properties view in the Properties panel.
3. Click Edit Text.
The Label / Dimension window displays and you can edit the text.
 Note: To define the default font and text size of Dimensions, Truss Labels, and Notes, see the Env Data settings for Layout > Dimensions.